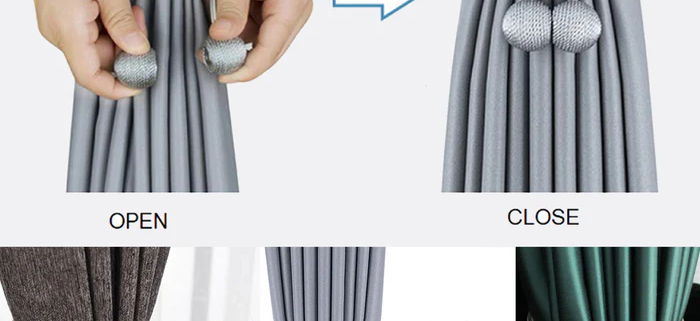
How do magnetic curtain tie-backs work?
Magnetic curtain tie-backs are a stylish and convenient way to hold back your curtains while letting in light and fresh air. They work by using the power of magnetism to securely hold the curtains in place. The tie-backs consist of two parts, a magnetic strip that is attached to the wall and a metal disc that is attached to the back of the curtain. When the metal disc comes in contact with the magnetic strip, it is held securely in place without the need for ties or knots. This allows for quick and easy access to the curtains and eliminates the need for traditional ties or hooks that can often be fiddly to use. Magnetic curtain tie-backs are an excellent choice for anyone who wants a hassle-free way to keep their curtains open while adding a touch of style to their décor.
Do magnetic curtain tie-backs work?
Yes, magnetic curtain tie-backs do work. They are designed to hold curtains securely in place using the power of magnetism. They consist of two parts, a magnetic strip that is attached to the wall and a metal disc that is attached to the back of the curtain. When the metal disc comes in contact with the magnetic strip, it is held firmly in place. They are a convenient and practical alternative to traditional curtain ties or hooks and can provide a stylish addition to any room’s decor. However, it’s important to note that the effectiveness of magnetic curtain tie-backs can vary based on the strength of the magnets used and the weight of the curtains they are holding.
How do you hang curtains with magnets?
Hanging curtains with magnets is a simple and easy process. Here’s how:
- Attach the magnetic strip: Adhere the magnetic strip to the wall where you want to hang your curtains. Make sure it’s level and secure.
- Attach the metal discs: Attach the metal discs to the back of the curtains, near the top, by sewing or using adhesive.
- Hang the curtains: Place the curtains in front of the window and bring the metal discs near the magnetic strip. The magnets will pull the metal discs and hold the curtains in place.
- Adjust the curtains: You can adjust the position of the curtains by moving the metal discs closer or further away from the magnets.
- Repeat for additional panels: If you have multiple panels of curtains, repeat the process for each one.
It’s important to choose the right size of magnets for your curtains, taking into consideration the weight of the fabric and the amount of light you want to let in. With the right magnets and proper installation, magnetic curtain tie-backs can be a functional and stylish addition to your home decor.
Here’s a simple guide to making your own magnetic curtain tie-backs:
Materials:
- Strong magnets
- Metal discs
- Sewing supplies (thread, needle, or sewing machine) or adhesive
- Scissors
- Ruler
Steps:
- Cut the metal discs: Cut the metal discs to the desired size, around 2-3 inches in diameter.
- Attach the magnets: Glue or sew a magnet to the center of each metal disc. Make sure the magnets are facing each other.
- Attach the metal discs to the curtains: Sew or glue the metal discs to the back of the curtains, near the top. Place them evenly on both sides of the curtains.
- Attach the magnetic strip to the wall: Adhere the magnetic strip to the wall where you want to hang the curtains. Make sure it’s level and securely attached.
- Hang the curtains: Place the curtains in front of the window and bring the metal discs near the magnetic strip. The magnets will pull the metal discs and hold the curtains in place.
- Adjust the curtains: You can adjust the position of the curtains by moving the metal discs closer or further away from the magnets.
With these simple steps, you can create your own custom magnetic curtain tie-backs that match your decor and are tailored to your needs. Just make sure to choose strong magnets to ensure the curtains stay securely in place.


Leave a Reply
Want to join the discussion?Feel free to contribute!